Hugging Face Course Notes: Chapter4

Hugging Face
Pytorch
Deep Learning
NLP
LLM
HuggingFaceHub
Author

Ismail TG

Published

February 26, 2024

The Hugging Face Hub:

Introduction:

  • The hugging Face Hub is the place where every Model, Dataset is deployed and stored.
  • In this chapter we will focus on how to:
    • Use a fine-tuned model from the Hub
    • Share and deploy a our model to the Hub
    • Build a model card
  • At its core a shared model is just a Git reposetory, which means that it can be cloned and used by others.
  • When a new model is shared to the community a hosted inference API is deployed automatically, so anyone can test that model directly or build on top of it.

Using pretrained models

  • As we saw in previous chapters, using finetuned models from the Hub on our tasks is easy and can be achieved with few lines of code
from transformers import pipeline
unmasker = pipeline("fill-mask", model = 'camembert-base')
unmasker("This course will teach you all about <mask> models.", top_k=2)
/usr/local/lib/python3.10/dist-packages/huggingface_hub/utils/_token.py:88: UserWarning: 
The secret `HF_TOKEN` does not exist in your Colab secrets.
To authenticate with the Hugging Face Hub, create a token in your settings tab (https://huggingface.co/settings/tokens), set it as secret in your Google Colab and restart your session.
You will be able to reuse this secret in all of your notebooks.
Please note that authentication is recommended but still optional to access public models or datasets.
  warnings.warn(
Some weights of the model checkpoint at camembert-base were not used when initializing CamembertForMaskedLM: ['roberta.pooler.dense.bias', 'roberta.pooler.dense.weight']
- This IS expected if you are initializing CamembertForMaskedLM from the checkpoint of a model trained on another task or with another architecture (e.g. initializing a BertForSequenceClassification model from a BertForPreTraining model).
- This IS NOT expected if you are initializing CamembertForMaskedLM from the checkpoint of a model that you expect to be exactly identical (initializing a BertForSequenceClassification model from a BertForSequenceClassification model).
[{'score': 0.1466376781463623,
  'token': 808,
  'token_str': 'the',
  'sequence': 'This course will teach you all about the models.'},
 {'score': 0.06081351637840271,
  'token': 9098,
  'token_str': 'this',
  'sequence': 'This course will teach you all about this models.'}]
  • Of course we need to pick a checkpoint that suitable for our task, otherwise we will get results that don’t male sense at all.
    • in this case we pick camembert-base which is a good checkpoint for filling mask tasks.
  • We could also insentiate the checkpoint from the model calss directly:
from transformers import CamembertTokenizer, CamembertForMaskedLM
ckpt = 'camembert-base'
tokenizer = CamembertTokenizer.from_pretrained(ckpt)
model = CamembertForMaskedLM.from_pretrained(ckpt)
Special tokens have been added in the vocabulary, make sure the associated word embeddings are fine-tuned or trained.
Some weights of the model checkpoint at camembert-base were not used when initializing CamembertForMaskedLM: ['roberta.pooler.dense.bias', 'roberta.pooler.dense.weight']
- This IS expected if you are initializing CamembertForMaskedLM from the checkpoint of a model trained on another task or with another architecture (e.g. initializing a BertForSequenceClassification model from a BertForPreTraining model).
- This IS NOT expected if you are initializing CamembertForMaskedLM from the checkpoint of a model that you expect to be exactly identical (initializing a BertForSequenceClassification model from a BertForSequenceClassification model).
  • However its recommended to use the auto class to handel the insentitating of model and tokenizers:
from transformers import AutoTokenizer, AutoModelForMaskedLM
tokenizer = AutoTokenizer.from_pretrained(ckpt)
model = AutoModelForMaskedLM.from_pretrained(ckpt)
Some weights of the model checkpoint at camembert-base were not used when initializing CamembertForMaskedLM: ['roberta.pooler.dense.bias', 'roberta.pooler.dense.weight']
- This IS expected if you are initializing CamembertForMaskedLM from the checkpoint of a model trained on another task or with another architecture (e.g. initializing a BertForSequenceClassification model from a BertForPreTraining model).
- This IS NOT expected if you are initializing CamembertForMaskedLM from the checkpoint of a model that you expect to be exactly identical (initializing a BertForSequenceClassification model from a BertForSequenceClassification model).
  • What’s important is to inderstand how that specific model is trained, which dataset is used, and what’s its limitations and biases.
    • all of this informastions should be mentioned in the model card (which we will build later)

Sharing a pretrained model:

  • In general there’s 3 ways to create a new model reposetories:

    • Using the push_to_hub API
    • Using the huggingface_hub Python library
    • Using the web interface
  • One the repo is created, we can add and edit files just like any other repo on github

Using the push_to_hub API:

  • The simplest way to create a model repo is to use push_to_hub API.
    • but first we need to get our credentials in order to use the API:
from huggingface_hub import notebook_login
notebook_login()
  • We used earlier the TrainingArguments class to pass hyper-parameters during the building of the training loop, the easiest way to push a model is by setting push_to_hub= True as an arguments:
from transformers import Trainer, TrainingArguments
training_arguments = TrainingArguments('test-train-0', save_strategy = 'epoch', push_to_hub= True)
  • Once the model is trained and the trainer.train() is called, the api will upload the model to the hub and save it in a repo with the name we pick test-train-0, but we can chose another name by passing hub_model_id="my_model_name"
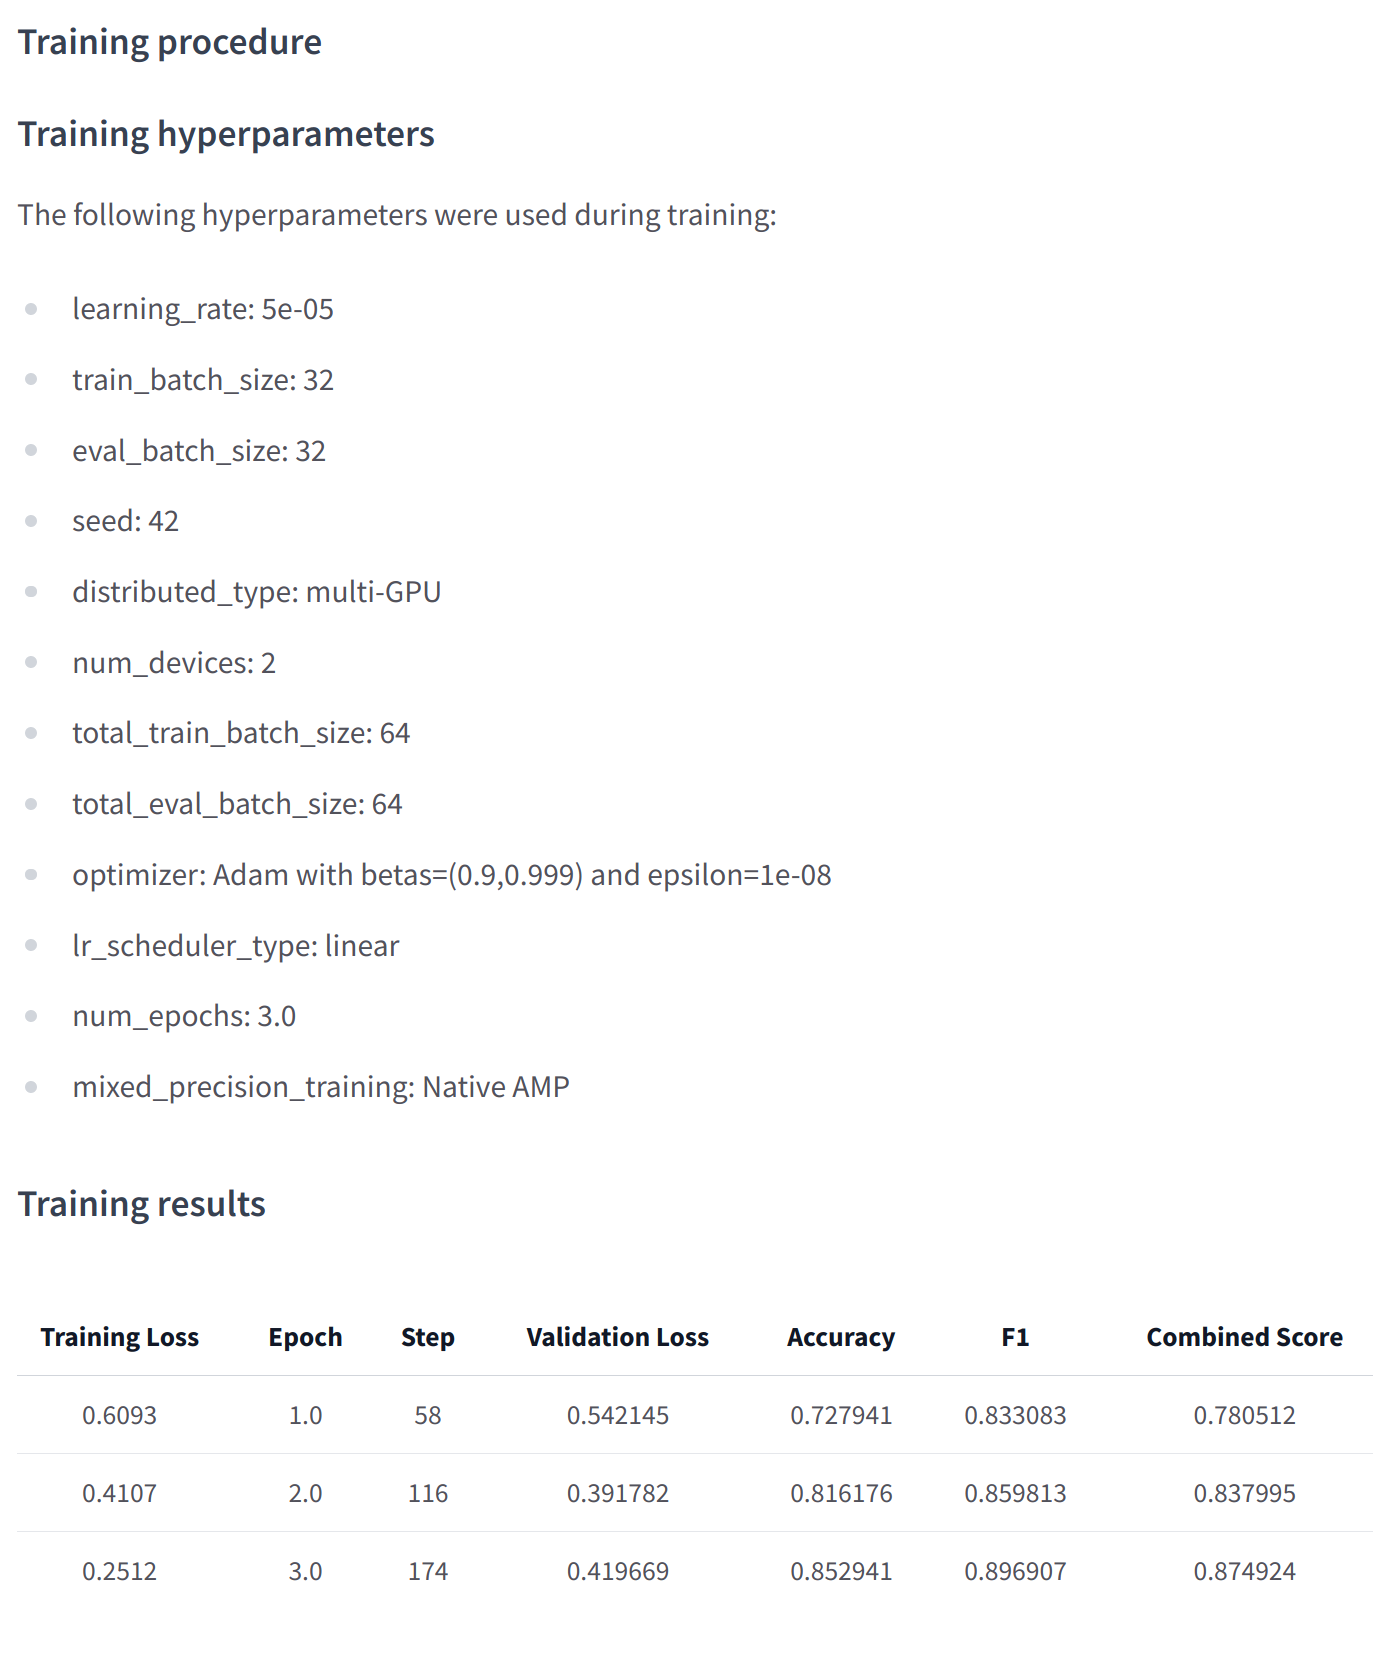
  • Once the training is complete we should do the final trainer_push_to_hub() to upload the last version of the model. This will also generate the model card, which contains all the metadata, hyperparameters and evaluation results.

model card From Hugging Face
  • The push_to_hub() method can be applied on model, tokenizer, configs. It take care of both: creating the repo and pushing the model and tokenizer directly to that repository.
  • Now let’s see exactly how this work:
from transformers import AutoTokenizer, AutoModelForMaskedLM
ckpt = 'bert-base-uncased'
tokenizer = AutoTokenizer.from_pretrained(ckpt)
model = AutoModelForMaskedLM.from_pretrained(ckpt)
Some weights of the model checkpoint at bert-base-uncased were not used when initializing BertForMaskedLM: ['bert.pooler.dense.bias', 'bert.pooler.dense.weight', 'cls.seq_relationship.bias', 'cls.seq_relationship.weight']
- This IS expected if you are initializing BertForMaskedLM from the checkpoint of a model trained on another task or with another architecture (e.g. initializing a BertForSequenceClassification model from a BertForPreTraining model).
- This IS NOT expected if you are initializing BertForMaskedLM from the checkpoint of a model that you expect to be exactly identical (initializing a BertForSequenceClassification model from a BertForSequenceClassification model).
  • Now we can take these model and build whatever we want with them, modify, add..and when we are satisfied with the results we can use push_to_hup() method:
model.push_to_hub('test-ch4')
CommitInfo(commit_url='https://huggingface.co/Smail/test-ch4/commit/2f5a775ac7e24540a43374fa820db4e225b195e2', commit_message='Upload BertForMaskedLM', commit_description='', oid='2f5a775ac7e24540a43374fa820db4e225b195e2', pr_url=None, pr_revision=None, pr_num=None)
  • This will create a new repo "test-ch4" in our profile and populate it with model files. We can do the same with tokenizer
tokenizer.push_to_hub('test-ch4')
CommitInfo(commit_url='https://huggingface.co/Smail/test-ch4/commit/e0b505500d75768b52d549adc8f67c3f40b015dd', commit_message='Upload tokenizer', commit_description='', oid='e0b505500d75768b52d549adc8f67c3f40b015dd', pr_url=None, pr_revision=None, pr_num=None)
  • we can also add the organization, tokenization key and other arguments that can be specified while pushing the model into the hub through API

Using the huggingface_hub Python library

  • We can also use the Huggingface_hub library that offer more tools that are simple and very effective to achieve various tasks such as pushing a model, adding files, deleting files, creating repos, editing, managing, getting informations etc.. *Similar to push_to_hub() method the package requires a key token to access the hub:
!huggingface-cli login

    _|    _|  _|    _|    _|_|_|    _|_|_|  _|_|_|  _|      _|    _|_|_|      _|_|_|_|    _|_|      _|_|_|  _|_|_|_|
    _|    _|  _|    _|  _|        _|          _|    _|_|    _|  _|            _|        _|    _|  _|        _|
    _|_|_|_|  _|    _|  _|  _|_|  _|  _|_|    _|    _|  _|  _|  _|  _|_|      _|_|_|    _|_|_|_|  _|        _|_|_|
    _|    _|  _|    _|  _|    _|  _|    _|    _|    _|    _|_|  _|    _|      _|        _|    _|  _|        _|
    _|    _|    _|_|      _|_|_|    _|_|_|  _|_|_|  _|      _|    _|_|_|      _|        _|    _|    _|_|_|  _|_|_|_|

    A token is already saved on your machine. Run `huggingface-cli whoami` to get more information or `huggingface-cli logout` if you want to log out.
    Setting a new token will erase the existing one.
    To login, `huggingface_hub` requires a token generated from https://huggingface.co/settings/tokens .
Token: 
Add token as git credential? (Y/n) n
Token is valid (permission: write).
Your token has been saved to /root/.cache/huggingface/token
Login successful
!huggingface-cli whoami
Smail
  • The huggingface_hub offers several methods and classes which are useful for our purpose. Firstly, there are a few methods to manage repository creation, deletion, and others:
from huggingface_hub import (
    #User Management
    login,
    logout,
    whoami,

    # Repo creation and management
    create_repo,
    delete_repo,
    update_repo_visibility,

    # And some methods to retrieve/change information about the content
    list_models,
    list_datasets,
    list_metrics,
    list_repo_files,
    upload_file,
    delete_file,

)
  • We could for example try to create a repo like this:
create_repo('dummi_repo')
RepoUrl('https://huggingface.co/Smail/dummi_repo', endpoint='https://huggingface.co', repo_type='model', repo_id='Smail/dummi_repo')
  • Other arguments which may be useful are:

    • private, in order to specify if the repository should be visible from others or not.
    • token, if you would like to override the token stored in your cache by a given token.
    • repo_type, if you would like to create a dataset or a space instead of a model. Accepted values are “dataset” and “space”.

Once the repository is created, we should add files to it! Jump to the next section to see the three ways this can be handled

Uploading Files:

  • The system to manage files on the Hugging Face Hub is based on git for regular files, and git-lfs (which stands for Git Large File Storage) for larger files.

  • In general there is 3 ways to upload files to the HUB:

The upload file approach

  • this approach doesn’t require installing git or git-lf on our system, it uses HTTP POST requests to push the files directly to the hub.
  • It’s limitation is the size of the file shouldn’t be larger than 5 GB.
  • Since I work in a google colab, I will create a folder and work with it “locally”.
!mkdir my_folder
from transformers import AutoModelForMaskedLM, AutoTokenizer

checkpoint = "camembert-base"

model = AutoModelForMaskedLM.from_pretrained(checkpoint)
tokenizer = AutoTokenizer.from_pretrained(checkpoint)

# Do whatever with the model, train it, fine-tune it...

model.save_pretrained("/content/my_folder")
tokenizer.save_pretrained("/content/my_folder")
Some weights of the model checkpoint at camembert-base were not used when initializing CamembertForMaskedLM: ['roberta.pooler.dense.bias', 'roberta.pooler.dense.weight']
- This IS expected if you are initializing CamembertForMaskedLM from the checkpoint of a model trained on another task or with another architecture (e.g. initializing a BertForSequenceClassification model from a BertForPreTraining model).
- This IS NOT expected if you are initializing CamembertForMaskedLM from the checkpoint of a model that you expect to be exactly identical (initializing a BertForSequenceClassification model from a BertForSequenceClassification model).
('/content/my_folder/tokenizer_config.json',
 '/content/my_folder/special_tokens_map.json',
 '/content/my_folder/sentencepiece.bpe.model',
 '/content/my_folder/added_tokens.json',
 '/content/my_folder/tokenizer.json')
from huggingface_hub import upload_file
upload_file(
    path_or_fileobj="/content/my_folder/config.json",
    path_in_repo="config.json",
    repo_id="Smail/dummi_repo",
)
CommitInfo(commit_url='https://huggingface.co/Smail/dummi_repo/commit/1af5f861f0e0a3398d3856c69ff83bd5f04c372a', commit_message='Upload config.json with huggingface_hub', commit_description='', oid='1af5f861f0e0a3398d3856c69ff83bd5f04c372a', pr_url=None, pr_revision=None, pr_num=None)
  • This will upload the config.json file exists in path_to_file to the root of the repo as config.json.

The Repository Class:

  • The repository class abstract a local repo and handle all the work in agit like manner, it requires having git and git-lf installed in our system.
!pip install git-LFS
Collecting git-LFS
  Downloading git_lfs-1.6-py2.py3-none-any.whl (5.6 kB)
Installing collected packages: git-LFS
Successfully installed git-LFS-1.6
!git lfs install
Git LFS initialized.
from huggingface_hub import Repository

repo = Repository('/content', clone_from= 'Smail/dummi_repo')
  • This will create a folder in the path we decide and will import all the files in the repo from the hub.
  • Since we didn’t create any files in that repo when we insantiate it, the only file we have is .gitattributes, from here we could deal with that repo as if it a git repo:
repo.git_pull()
repo.git_add()
repo.git_commit()
repo.git_push()
repo.git_tag()
  • First we have to make the repo up-to-date with:
repo.git_pull()
  • We can now save the model and tokenizer in the directotry
model.save_pretrained('my_folder')
tokenizer.save_pretrained('my_folder')
  • Now our local folder countains 2 new files and we could push them to the hub:
repo.git_add()
repo.git_commit('add model and tokenizer')
repo.git_push()

The git-based approach

  • This method is very similar to the one before, its barbone method that in pure git and bash.
  • First let’s install git and git-lf:
!pip install git-LFS
Requirement already satisfied: git-LFS in /usr/local/lib/python3.10/dist-packages (1.6)
  • And the initialize git and lfs
!git lfs install
Updated git hooks.
Git LFS initialized.
  • Now we can clone the repo from the hub the normal way:
!git clone https://huggingface.co/Smail/test-model-2
Cloning into 'test-model-2'...
remote: Enumerating objects: 4, done.
remote: Total 4 (delta 0), reused 0 (delta 0), pack-reused 4
Unpacking objects:  25% (1/4)Unpacking objects:  50% (2/4)Unpacking objects:  75% (3/4)Unpacking objects: 100% (4/4)Unpacking objects: 100% (4/4), 1.12 KiB | 1.12 MiB/s, done.
  • Since we are using bash, we could naigate the directory like this:
!cd test-model-2 && ls
README.md
  • This will chnage the directory the repo we just cloned, and print all the files in it.
  • Now we can build a model like we did before and save all the files in the repo we cloned and push them to the hub:
from transformers import AutoModelForMaskedLM, AutoTokenizer

checkpoint = "camembert-base"

model = AutoModelForMaskedLM.from_pretrained(checkpoint)
tokenizer = AutoTokenizer.from_pretrained(checkpoint)

# Do whatever with the model, train it, fine-tune it...

model.save_pretrained("/content/test-model-2")
tokenizer.save_pretrained("/content/test-model-2")
Some weights of the model checkpoint at camembert-base were not used when initializing CamembertForMaskedLM: ['roberta.pooler.dense.bias', 'roberta.pooler.dense.weight']
- This IS expected if you are initializing CamembertForMaskedLM from the checkpoint of a model trained on another task or with another architecture (e.g. initializing a BertForSequenceClassification model from a BertForPreTraining model).
- This IS NOT expected if you are initializing CamembertForMaskedLM from the checkpoint of a model that you expect to be exactly identical (initializing a BertForSequenceClassification model from a BertForSequenceClassification model).
('/content/test-model-2/tokenizer_config.json',
 '/content/test-model-2/special_tokens_map.json',
 '/content/test-model-2/sentencepiece.bpe.model',
 '/content/test-model-2/added_tokens.json',
 '/content/test-model-2/tokenizer.json')
!ls
my_folder  sample_data  test-model-2
!cd test-model-2 && ls
added_tokens.json  model.safetensors  sentencepiece.bpe.model  tokenizer_config.json
config.json    README.md          special_tokens_map.json  tokenizer.json
  • Now that we’ve saved some model and tokenizer artifacts, let’s take another look at the folder:

If you look at the file sizes (for example, with ls -lh), you should see that the model state dict file (pytorch_model.bin) is the only outlier, at more than 400 MB.

We can now go ahead and proceed like we would usually do with traditional Git repositories. We can add all the files to Git’s staging environment using the git add command:

!cd test-model-2 && git add .
!cd test-model-2 && git status
On branch main
Your branch is up to date with 'origin/main'.

Changes to be committed:
  (use "git restore --staged <file>..." to unstage)
    new file:   added_tokens.json
    new file:   config.json
    new file:   model.safetensors
    new file:   sentencepiece.bpe.model
    new file:   special_tokens_map.json
    new file:   tokenizer.json
    new file:   tokenizer_config.json
  • Similarly, we can make sure that git-lfs is tracking the correct files by using its status command:
!cd test-model-2 && git lfs status
On branch main
Objects to be pushed to origin/main:


Objects to be committed:

    added_tokens.json (Git: 43734cd)
    config.json (Git: 4b8db4b)
    model.safetensors (LFS: 2785d2e)
    sentencepiece.bpe.model (LFS: 988bc5a)
    special_tokens_map.json (Git: b547935)
    tokenizer.json (Git: 9a9362e)
    tokenizer_config.json (Git: c49982e)

Objects not staged for commit:

  • We can see that all files have Git as a handler, except pytorch_model.bin and sentencepiece.bpe.model, which have LFS. Great!

  • Let’s proceed to the final steps, committing and pushing to the huggingface.co remote repository:

!cd test-model-2 && git commit -m "First model version"
[main adaa023] First model version
 7 files changed, 128351 insertions(+)
 create mode 100644 added_tokens.json
 create mode 100644 config.json
 create mode 100644 model.safetensors
 create mode 100644 sentencepiece.bpe.model
 create mode 100644 special_tokens_map.json
 create mode 100644 tokenizer.json
 create mode 100644 tokenizer_config.json

*Pushing can take a bit of time, depending on the speed of your internet connection and the size of your files:

!cd test-model-2 && git push
Enumerating objects: 10, done.
Counting objects: 100% (10/10), done.
Delta compression using up to 2 threads
Compressing objects: 100% (8/8), done.
Writing objects: 100% (9/9), 592.06 KiB | 5.10 MiB/s, done.
Total 9 (delta 0), reused 0 (delta 0), pack-reused 0
To https://huggingface.co/Smail/test-model-2
   6266b40..adaa023  main -> main

Building Model Card:

  • Model card plays a crucial role in open source model, it allow others to build an idea about the important element of the model without spending time and effort, it ensures reusability and reproducibility of the results.

  • By documenting the training and evaluation process we hepl other understand what they expect from the model, its limitations and capabilities, also we have to provide enough iformations about the data we train the model and how it was preprocessed.

  • The model card usually starts with a very brief, high-level overview of what the model is for, followed by additional details in the following sections:

    • Model description
    • Intended uses & limitations
    • How to use
    • Limitations and bias
    • Training data
    • Training procedure
    • Evaluation results

Model Description:

  • The model description provides basic details about the model. This includes the architecture, version, if it was introduced in a paper, if an original implementation is available, the author, and general information about the model. Any copyright should be attributed here. General information about training procedures, parameters, and important disclaimers can also be mentioned in this section.

Intended uses & limitations

  • Here you describe the use cases the model is intended for, including the languages, fields, and domains where it can be applied. This section of the model card can also document areas that are known to be out of scope for the model, or where it is likely to perform suboptimally.

How to use

  • This section should include some examples of how to use the model. This can showcase usage of the pipeline() function, usage of the model and tokenizer classes, and any other code you think might be helpful.

Training data

  • This part should indicate which dataset(s) the model was trained on. A brief description of the dataset(s) is also welcome.

Training procedure

  • In this section you should describe all the relevant aspects of training that are useful from a reproducibility perspective. This includes any preprocessing and postprocessing that were done on the data, as well as details such as the number of epochs the model was trained for, the batch size, the learning rate, and so on.

Variable and metrics

  • Here you should describe the metrics you use for evaluation, and the different factors you are mesuring. Mentioning which metric(s) were used, on which dataset and which dataset split, makes it easy to compare you model’s performance compared to that of other models. These should be informed by the previous sections, such as the intended users and use cases.

Evaluation results

  • Finally, provide an indication of how well the model performs on the evaluation dataset. If the model uses a decision threshold, either provide the decision threshold used in the evaluation, or provide details on evaluation at different thresholds for the intended uses.