Chapter 2: Deep learning for coders with fastai and pytorch
Fastai
Pytorch
HugginFace
Gradio
Deep Learning
Author
Ismail TG
Published
October 25, 2022
Practice of Deep Learning
As we saw in the previous Chapter, we can create powerful model with only 6 lines of code
Althought we should understand the constraints of the process and not overestimate the capabilities of deep learnig, this may lead to frustaingtly poor result
Also we need to not overestimate the constraints, and underestimate what could do with deep learning
The mindset Of Deep Learning Practitioner
Before starting any Deep learning project, we need first to investigate the data availability
That doens’t mean we need the Perfect dataset
We need to iterate from End-2-End
Do not spent weeks on fine-tuning, polishing the GUI, or desing the perfect way of labeling the dataset
Just complet each step in a reasonable amout of time, then iterate the whole proccess from beginning
Iteration shows the flows of your project as well as its capabilities
The early Demo of your project helps you to have feedback and try to do better
Start a project in field that Deep Learning already been shown good results
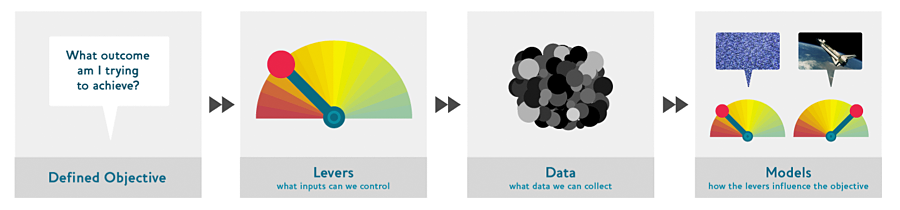
The Drivetrain Approach
drivetrain_approach
In this article-Jeremy Howard, Margit Zwemer and Mike Loukides- talks about the driventain approach for building a great data product through Four-Steps process
Steps
Define your Objective
Levers
What inputs can we control?
The necessary actions the realise that Objective
Data
What Data can we collect
Models
Build a model that make us meet our objective, but also in respect to: Levers an Data
Data Gathering
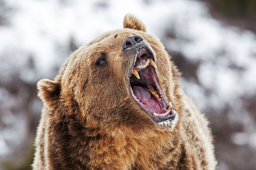
In this Chapter we will build a model that can differentiate among 3 types of bears: Grizzly, Black, Teddy-bear.
Often we can find the data we need for a project online. In our case we will collect data from search enging DuckDuckGo But first we need to install the fastai package and import some dependecies since I’m working on Google Colab
# Now let's download an url and store it in a specified destination ('images/bear.jpg') then open itdownload_url(urls[7], 'images/bear.jpg')im = Image.open('images/bear.jpg')im.thumbnail((256,256))im
101.54% [229376/225897 00:00<00:00]
# now let's create our datasetbear_types ='grizzly','black','teddy'# create 3 types of bears variablepath = Path('bears') # create the father folder for the 3 typesifnot path.exists(): # decide the path path.mkdir()for o in bear_types: dest = (path/o) # put the 3 folder in bear folder dest.mkdir(exist_ok=True) # create a folder for each type of bear urls = search_images_ddg(f' {o} bear') # search images for each bear type download_images(dest, urls=urls) # download these images from urls and put them in their correspondent folder
# since we're collecting from internet, there's a chance some of the files we downloaded are corruptedfailed = verify_images(fns)len(failed), failed # 2 corrupted images founded!
The dataset that we’ve created still isn’t ready to be used in the training fase, we still need to make suitable for the model, in order to do that we need DataBlock and DataLoaders
Dataloaders
A thin fastai class that just stores whatever DataLoader objects passed to it and makes them available as the properties train and valid
Provides the data for your model
Information needed to turn downloaded data into DataLoaders objects * The kind of data we are working with * How to get the list of items * How to label these items * How to create the validation set
Dataloder
A class that provides batches of a few items at a time to the GPU
Data block API
A flexible system to fully customize every stage of the creation of your DataLoaders
Data block: a template for creating a DataLoaders object
Independent variable: the thing we are using to make predictions
Dependent variable: the target variable to predict
Training data is fed to a model in batches
Each image in a batch needs to be the same size
bears = DataBlock(
    blocks=(   # Define blocks for data and labels
        ImageBlock, # TransformBlock for Images
        CategoryBlock), # TransformBlock for labels
    get_items=get_image_files, # Get images from the path
    splitter=RandomSplitter(valid_pct=0.2, seed=42), # Create training set, and training set (20% of dataset) randomely
    get_y=parent_label, # Label `item` with the parent folder name
    item_tfms=Resize(128)) # Resize and crop image to 128x128
# Create a `DataLoaders` object from `path`dls = bears.dataloaders(path)
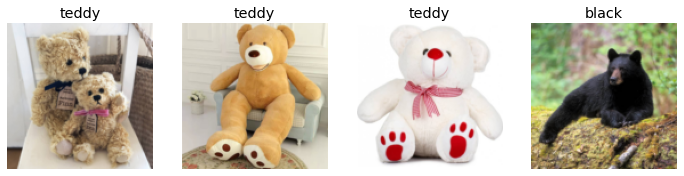
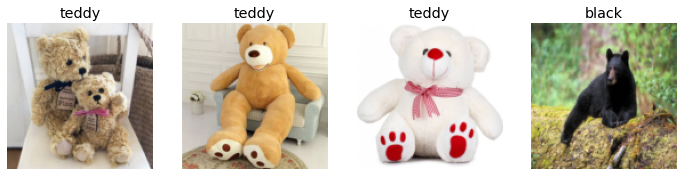
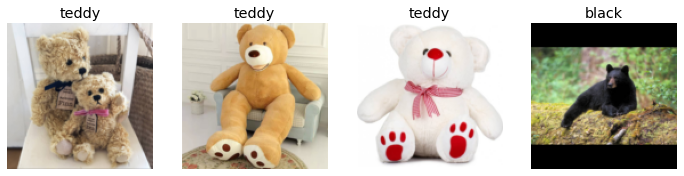
# Show some samples from the validation setdls.valid.show_batch(max_n=4, nrows=1)
By default Resize crop the image into a square of the requested size, but that can result losing some important details which will negatively impact the model performance. Fastai provide many methods that we can use, we can squatsh, pad(with zeros) or stretch the images:
# Create a new `DataBlock` that resizes and squishes images to 128x128bears = bears.new(item_tfms=Resize(128, ResizeMethod.Squish))
# or pad the imagesbears = bears.new(item_tfms=Resize(128, ResizeMethod.Pad, pad_mode='zeros'))dls = bears.dataloaders(path)dls.valid.show_batch(max_n=4, nrows=1)
The problem with these approaches, is that they add detaills and they mess with the original images, which will certainely influence the learnings of the model, this will effect the accuracy of the model later.
Instead, we could randomly crop a part of the image, one part at the time (each epoch) and pass it to the training process, what will force the model to focus on recognizing different features of the image each time.
The method RandomResizedCrop allow us to transform images in the way we just described
# Create a new `DataBlock` that picks a random scaled crop of an image and resize it to 128x128bears = bears.new(item_tfms=RandomResizedCrop(128, min_scale=0.3))dls = bears.dataloaders(path)# Show some unique random crops of a single sample from the validation setdls.train.show_batch(max_n=4, nrows=1, unique=True)
Data augmentation
Data augmentation refers to creating random variations of the data, such as they appears different, but without changing the real meaning of the data.
Examples of common data augmentation techniques for images are rotation, flipping, perspective warping, brightness changes and contrast changes.
It seems that for natural image like the ones we have here, the function: aug_transforms works well
because our images have different size, using the parametrs batch_tfms and feeding them to GPU will save use a lot of time.
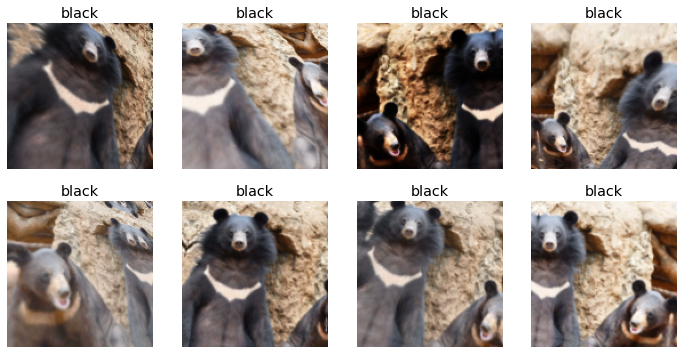
# Create a new `DataBlock` that crops and resizes each image to 128x128# and applies a list of data augmentations including flip, rotate, zoom, warp, lighting transforms# to each batch on the GPUbears = bears.new(item_tfms=Resize(128), batch_tfms=aug_transforms(mult=2))dls = bears.dataloaders(path)dls.train.show_batch(max_n=8, nrows=2, unique=True)
Training Your Model, and Using It to Clean Your Data
Cleaning data and getting it ready for your model are two of the biggest challenges for data scientists
Data scientists say it takes 90% of their time
Using the model for data cleaning
Train the model on the current dataset
Examine the incorrectly classified images with the highest confidence score
There might be images that were incorrectly labeled
Examine the incorrectly labeled images with the lowest confidence scores
There might be poor quality images in the training set
# create the learner and fine-tune it as usuallearn = vision_learner(dls, resnet18, metrics=error_rate)
/usr/local/lib/python3.7/dist-packages/torchvision/models/_utils.py:209: UserWarning: The parameter 'pretrained' is deprecated since 0.13 and will be removed in 0.15, please use 'weights' instead.
  f"The parameter '{pretrained_param}' is deprecated since 0.13 and will be removed in 0.15, "
/usr/local/lib/python3.7/dist-packages/torchvision/models/_utils.py:223: UserWarning: Arguments other than a weight enum or `None` for 'weights' are deprecated since 0.13 and will be removed in 0.15. The current behavior is equivalent to passing `weights=ResNet18_Weights.IMAGENET1K_V1`. You can also use `weights=ResNet18_Weights.DEFAULT` to get the most up-to-date weights.
  warnings.warn(msg)
Downloading: "https://download.pytorch.org/models/resnet18-f37072fd.pth" to /root/.cache/torch/hub/checkpoints/resnet18-f37072fd.pth
learn.fine_tune(4)
epoch
train_loss
valid_loss
error_rate
time
0
0.909149
0.064802
0.026316
00:31
epoch
train_loss
valid_loss
error_rate
time
0
0.130756
0.022457
0.008772
00:27
1
0.118846
0.019686
0.008772
00:27
2
0.086960
0.024602
0.017544
00:28
3
0.072738
0.024477
0.017544
00:28
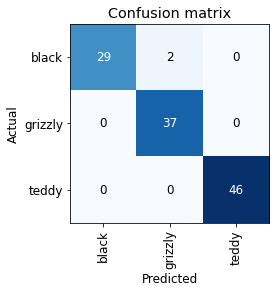
# this allow us investigate where the model do bad prediction, # and we can see these datapoints in order to understand what happendinterp = ClassificationInterpretation.from_learner(learn)interp.plot_confusion_matrix()
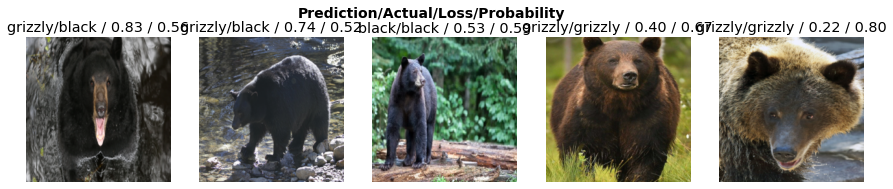
#show where the model has bad lossinterp.plot_top_losses(5, nrows=1)
As we see here the model did good predictions in 3 of 5 high losses datapoints but it was mislabeled, the other two images are actualy not actual bears. This method allow us to clean the dataset in a efficient way.
fastai includes a handy GUI for data cleaning called ImageClassifierCleaner that allows you to choose a category and the training versus validation set and view the highest-loss images (in order), along with menus to allow images to be selected for removal or relabeling:
cleaner = ImageClassifierCleaner(learn)cleaner
# change directory for all miss-labeled imagesfor idx in cleaner.delete(): cleaner.fns[idx].unlink()# delete unrelated imagesfor idx,cat in cleaner.change(): shutil.move(str(cleaner.fns[idx]), path/cat)
Deep Learning In Production
When we create a model that met our objectives, we can then pass to the Production phase, where we transform the model into an appliction/service etc..
But first we need to export the model into a file:
learn.export()
Let’s check that the file exists, by using the ls method that fastai adds to Python’s Path class:
path = Path()path.ls(file_exts='.pkl')
(#1) [Path('export.pkl')]
Now with the export.pkl file we can create normal program that takes inputs(images) and produce results (predictions) just like any traditional app
At this point we won’t call it a model anymore, we call it inference.
>Using the trained model as program
The export() function allow us to save the model in oreder to use it later, and as we know model is Architecture + Parameters, Fastai by default saves also the method of which we’ve created the DataLoaders, because otherwise we have to define it again in order to work with the new data we will feed to the model.
From Model to Inference
This file export.pkl is allways needed wherever we will create an app from it, for now we will use it whithin this notebook in order to create a small app that can predict bears type from image we will provide.
When we use a model for getting predictions, instead of training, we call it inference.
To create inference learner from export.pkl file we use load_learner:
learn_inf = load_learner(path/'export.pkl')
# predicting one imagelearn_inf.predict('images/bear.jpg')
the predicted category(label) in the same format we originally provided (in this case that’s a string),
the index of the predicted category, and the probabilities of each category.
the last two are based on the order of categories in the vocab of the DataLoaders; that is, the stored list of all possible categories.
At inference time, you can access the DataLoaders as an attribute of the Learner:
learn_inf.dls.vocab
['black', 'grizzly', 'teddy']
We can see here that if we index into the vocab with the integer returned by predict then we get back “grizzly,” as expected. Also, note that if we index into the list of probabilities, we see a nearly 1.00 probability that this is a grizzly.
Gradio + HugginFace Spaces
If we want to share our model with a broader audience, and showcase our skills we need to create a real app that can be used outside of the datascience/machine learning word where nobody know or have the ability to use jupyter notebook or python.. and that’s why we will show using a combination of python package Gradio that will allow us to build our app, then host it on HuggingFace
# create labels from dalaloaders vocablabels = learn.dls.vocab# predicting function that take an image as input and use learn.predict to ouput:# prediction, prediction index, and probability.def predict(img): img = PILImage.create(img) pred,pred_idx,probs = learn.predict(img)return {labels[i]: float(probs[i]) for i inrange(len(labels))}
Here we will use gradio in order to create an app withing this notebook.
import gradio as grgr.Interface(fn=predict, inputs=gr.inputs.Image(shape=(512, 512)), outputs=gr.outputs.Label(num_top_classes=3)).launch(share=True)
/usr/local/lib/python3.7/dist-packages/gradio/inputs.py:257: UserWarning: Usage of gradio.inputs is deprecated, and will not be supported in the future, please import your component from gradio.components
  "Usage of gradio.inputs is deprecated, and will not be supported in the future, please import your component from gradio.components",
/usr/local/lib/python3.7/dist-packages/gradio/deprecation.py:40: UserWarning: `optional` parameter is deprecated, and it has no effect
  warnings.warn(value)
/usr/local/lib/python3.7/dist-packages/gradio/outputs.py:197: UserWarning: Usage of gradio.outputs is deprecated, and will not be supported in the future, please import your components from gradio.components
  "Usage of gradio.outputs is deprecated, and will not be supported in the future, please import your components from gradio.components",
/usr/local/lib/python3.7/dist-packages/gradio/deprecation.py:40: UserWarning: The 'type' parameter has been deprecated. Use the Number component instead.
  warnings.warn(value)
Colab notebook detected. To show errors in colab notebook, set `debug=True` in `launch()`
Running on public URL: https://bbc80cb39aa58cc0.gradio.app

This share link expires in 72 hours. For free permanent hosting and GPU upgrades (NEW!), check out Spaces: https://huggingface.co/spaces
(<gradio.routes.App at 0x7f45d2b49710>,
 'http://127.0.0.1:7860/',
 'https://bbc80cb39aa58cc0.gradio.app')
Still the best way of creating app for inference is to use Hugginface platform with help of gradio.
Here is the app that classify bears types based the .pkl file we created from our model we trained: Here

 >Using the trained model as program